Developing on Android - a first client
Prequisites
You must have Android (APK and Eclipse plugin) installed. We also assume that you have completed the Hello, World! tutorial.
Overview
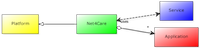
The JARs created by the Net4Care archetype (as in the Hello, World! spirometry tutorial) may be used in an Android application. The present tutorial explains how to create an Android client to replace the client generated by the Net4Care archetype.
Steps
1. Create an Android application
Create an Android application (e.g., "n4c_android") in Eclipse with an Activity for creating and sending spirometry measurements (e.g., "Spirometry").
2. Add Net4Care and spirometry JARs
You will need to add the following JARs as library dependencies:
- n4c_observation (from the Net4Care platform)
- n4c_serializer (from the Net4Care platform)
- n4c_forwarder (from the Net4Care platform)
- HelloWorld (from the "Hello, World!" tutorial)
To add one of these JARs, the recommended way is to (in Properties -> Java Build Path -> Add Variable...) "Extend..." the M2_REPO environment variable (cf. the Eclipse Maven setup) to point to JARs in your local Maven repository, which can be found under "org", "net4care", "n4c_DEPENDENCY_NAME", "0.X-SNAPSHOT". Once you have added the JARs, you must tell Eclipse to provide these libraries at runtime by selecting them in the "Order and Export" tab.
Finally, the Android application must have permissions for using the Internet. Simply add this line in the Android manifest, right above the "<application>" tag:
<uses-permission android:name="android.permission.INTERNET" />
3. Implement the Spirometry activity
Create functionality for inputting and sending a spirometry measurement. The following screenshot shows a possible activity layout:
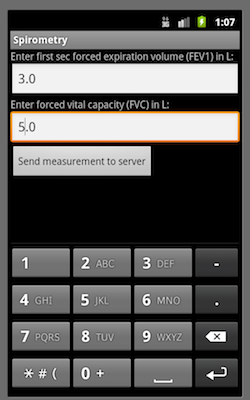
In this activity, the following OnClickListener will send data to the server, receive echo data, and write the data into the Android activity log:
    public void onCreate(Bundle savedInstanceState) {
        super.onCreate(savedInstanceState);
        setContentView(R.layout.main);
        ((Button) findViewById(R.id.button1)).setOnClickListener(new OnClickListener() {
          @Override
          public void onClick(View v) {
            try {
              Serializer serializer = new JacksonJSONSerializer();
              StandardTeleObservation observation = defineSpirometryObservation();
              StandardDataUploader dataUploader = new StandardDataUploader(serializer,
                  new HttpConnector("http://10.0.2.2:8082/observation"));
              FutureResult result = dataUploader.upload(observation);
              result.awaitUninterruptibly();
            } catch (IOException e) {
              e.printStackTrace();
            }
          }
        });
    }
Here, defineSpirometryObservation() is defined similarly to HelperMethods.defineSpirometryObservation() in "n4c_test". Remember that you will need a CPR number recognized by the the system to define observations. You can find a list of recognized CPR numbers in the class "FakeObjectExternalDataSource" located in "n4c_storage".
4. Run the spirometry application
To run the application, you need to first run the spirometry server:
  cd n4c_server
  mvn pax:provision
and, secondly, run the Android application from Eclipse. The code above assumes (because of the URL) that the Android application is run in an emulator running on the same computer as the server.
Finally, you may inspect the log in the DDMS perspective in Eclipse and the server log located in "n4c_receiver/runner/net4care.log" to ensure that the data was sent and received correctly.